# 运维
# 性能工具图

# 基本
# 查看系统信息
# 方法1
cat /proc/version

# 方法2
uname -a
# 查看系统版本信息
lsb_release -a
# 查看CPU配置
lscpu
# top

# 查看进程下的线程信息
top -Hp pid
# 查看内存大小
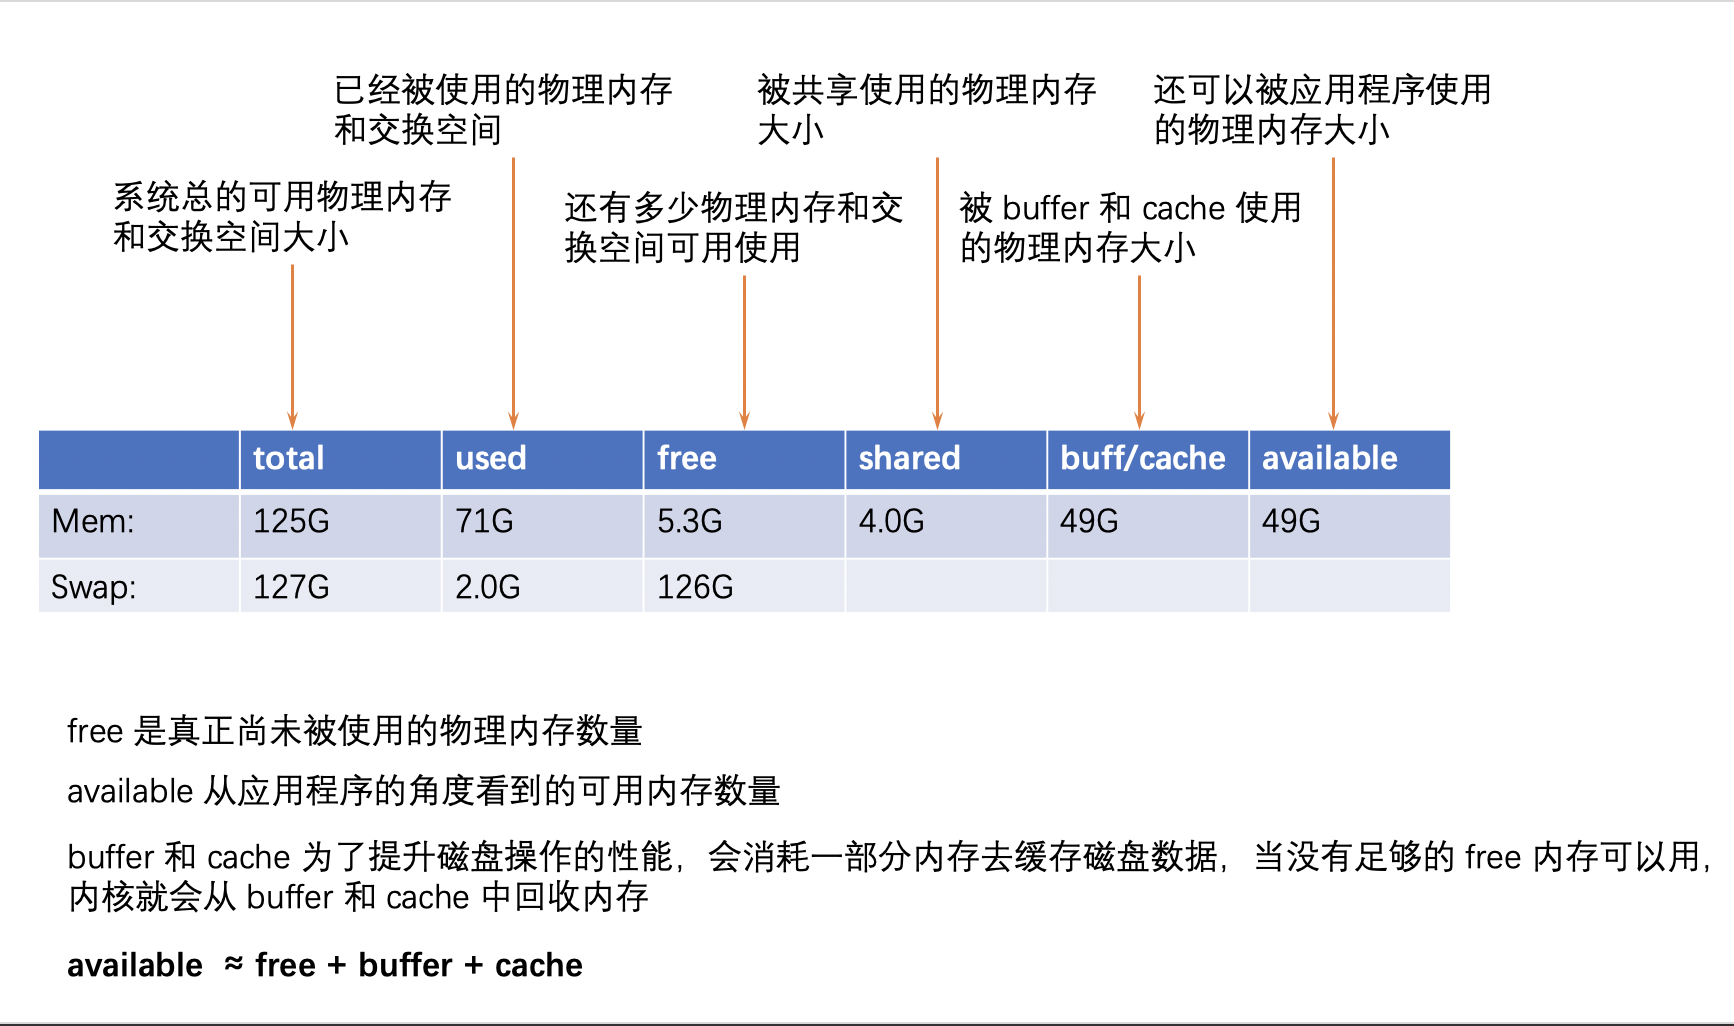
# 输出便于理解的内存信息
free -h
              total        used        free      shared  buff/cache   available
Mem:           125G         71G        5.1G        4.0G         49G         49G
Swap:          127G        2.0G        126G
# 定时输出
free -h -s 3
 total        used        free      shared  buff/cache   available
Mem:           125G         71G        6.3G        4.0G         48G         49G
Swap:          127G        2.0G        126G

              total        used        free      shared  buff/cache   available
Mem:           125G         71G        6.3G        4.0G         48G         49G
Swap:          127G        2.0G        126G

              total        used        free      shared  buff/cache   available
Mem:           125G         71G        6.3G        4.0G         48G         49G
Swap:          127G        2.0G        126G

              total        used        free      shared  buff/cache   available
Mem:           125G         71G        6.3G        4.0G         48G         49G
Swap:          127G        2.0G        126G
# 硬盘大小
lsblk
# ssh-copy-id远程登录
#生成公钥
ssh-keygen
#用ssh-copy-id将公钥复制到远程机器中
ssh-copy-id -i .ssh/id_rsa.pub  root@192.168.x.xxx
#登录到远程机器不用输入密码
ssh root@192.168.x.xxx
# 新建软连接
ln -s source link
# 代理隧道
# 如果以前有这个用户,删除
userdel sshproxyuser
rm -rf  /home/sshproxyuser

# 添加用户
useradd --create-home sshproxyuser

# 转至用户
su - sshproxyuser
ssh-keygen
vim /home/sshproxyuser/.ssh/authorized_keys

# 修改shell,改为不能登陆
chsh -s /sbin/nologin sshproxyuser
# 删除密码
passwd --delete sshproxyuser
问题
使用 下面命令登陆会提示输入密码
ssh -D 1078 -f -C -q -N sshproxyuser@120.77.38.170 -p 65022
查看authorized_keys权限,如果除了自己的其他人可以修改,那么ssh会跳过认证,还是要求输入密码,所以需要修改权限
-rw-rw-r-- 1 sshproxyuser sshproxyuser 398 Mar 4 15:46 authorized_keys
修改权限
chmod g-w /home/sshproxyuser/.ssh/authorized_keys
#修改完成后
-rw-r--r-- 1 sshproxyuser sshproxyuser  398 Mar  4 15:46 authorized_keys
# find
# find 命令找到大于100M文件
find . -size +100M
# find 指定的文件并打包
# 找到小于1M的文件并打包
find ./ -type f -size -1024k | grep -v  logs | xargs tar jcvf sdk-backend.tar.gz
# 找到指定文件并打包
find ./ -type f -name 'rabbit-*.jar' |  xargs tar jcvf sdk-backend.tar.gz
# 打包指定文件并排除一些文件
tar -jcvf /tmp/sdk-backend.tar.gz /data/server/ --exclude='*.([log]|[txt]|[out])' --include='./rabbit-app-center-server-36030'
# sed
如何使用 sed 命令删除文件中的行 (opens new window)
# Rsysc
# 复制文件夹并且排除某一些文件
-a参数表示archive模式,-v表示详细链模式输出,-z表示传输文件时使用压缩传输的模式
--exclude后面的路径不能为绝对路径,必须为相对路径才可以,否则出错
rsync -av --exclude=theme-default/README.md --exclude=theme-default/__tests__ --exclude=theme-default/package.json theme-default /Applications/projects/databook/
Linux下tar、cp命令排除某个目录或文件 - ReggieQiao - 博客园 (opens new window)
# dmesg
查看系统消息
dmesg -T | less
# lsof
linux lsof命令详解 - 星火spark - 博客园 (opens new window)
# 1.列出所有打开的文件:
lsof
备注: 如果不加任何参数,就会打开所有被打开的文件,建议加上一下参数来具体定位

# 2. 查看谁正在使用某个文件
lsof   /filepath/file

# 3.递归查看某个目录的文件信息 备注: 使用了+D,对应目录下的所有子目录和文件都会被列出
lsof +D /filepath/filepath2/

# 4. 比使用+D选项,遍历查看某个目录的所有文件信息 的方法
lsof | grep ‘/filepath/filepath2/’

# 5. 列出某个用户打开的文件信息
lsof  -u username

#6. 列出某个程序所打开的文件信息
lsof -c mysql

#7. 列出多个程序多打开的文件信息
lsof -c mysql -c apache

#8. 列出某个用户以及某个程序所打开的文件信息
lsof -u test -c mysql

# 9. 列出除了某个用户外的被打开的文件信息

lsof   -u ^root

# 10. 通过某个进程号显示该进行打开的文件
lsof -p 1

# 11. 列出多个进程号对应的文件信息
lsof -p 123,456,789

# 12. 列出除了某个进程号,其他进程号所打开的文件信息
lsof -p ^1

# 13 . 列出所有的网络连接
lsof -i

# 14. 列出所有tcp 网络连接信息
lsof  -i tcp

# 15. 列出所有udp网络连接信息
lsof  -i udp

# 16. 列出谁在使用某个端口
lsof -i :3306

# 17. 列出谁在使用某个特定的udp端口
lsof -i udp:55

# 特定的tcp端口
lsof -i tcp:80

# 18. 列出某个用户的所有活跃的网络端口
lsof  -a -u test -i

# 19. 列出所有网络文件系统
lsof -N

# 20.域名socket文件
lsof -u

# 21.某个用户组所打开的文件信息
lsof -g 5555

# 22. 根据文件描述列出对应的文件信息
lsof -d description(like 2)

# 23. 根据文件描述范围列出文件信息
lsof -d 2-3
# crontab
# crontab批量修改替换
比如之前有这些 ,每周五执行clearLog.sh
30 3 * * * /bin/find /var/log/kudu/ -mtime +60 -type f -name "*invalid-user.log*" -exec /bin/rm -f {} \;
00 19 * * 5 sh /root/clearLog.sh
现在想修改一下,改为每天执行
(crontab -l | sed 's/5 sh/* sh/') | crontab
# 基于cron定时删除日志
30 3 * * * /bin/find /root/zbmy/realtime/logs/error/ -mtime +60 -type f -name "error*.*.log" -exec /bin/rm -f {} \;

30 3 * * * /bin/find /var/log/kudu/ -mtime +60 -type f -name "*invalid-user.log*" -exec /bin/rm -f {} \;
# SCP
# scp指定端口
scp -P 65532 /Users/apple/Downloads/install-release.sh root@lovedata:/data/
# Mac
# 定时任务相关
#加载定时任务
launchctl load  com.lovedata.checktoken.plist

#卸载
launchctl unload  com.lovedata.checktoken.plist

#执行
launchctl start  com.lovedata.checktoken.plist
# 批量杀死同名进程
kill $(ps -ef|grep chromedriver |awk '$0 !~/grep/ {print $2}' |tr -s '\n' ' ')
kill $(ps -ef|grep 'Google Chrome Helper' |awk '$0 !~/grep/ {print $2}' |tr -s '\n' ' ')
# 安装程序显示文件已经损坏

1、打开任何来源。 2、打开终端,执行下面的命令。
sudo xattr -r -d com.apple.quarantine /Applications/Sublime\ Text.app
# Item2 Pem文件登陆
sudo chmod 0600 pem文件名.pem
ssh -i pem文件名.pem 用户名@登陆的IP
# Mac关闭SIP
重启Mac,按住⌘ + R进入Recovery模式。 实用工具(Utilities)-> 终端(Terminal)。 输入命令csrutil disable运行。 重启进入系统后,终端里输入 csrutil status,结果中如果有 System Integrity Protection status:disabled. 则说明关闭成功。
➜  ~ csrutil status
System Integrity Protection status: disabled.
# 磁盘
# du
# 查看某个目录 大小
du -bsh /usr/
# 查看当前目录下各个文件占用情况
du -ah --max-depth=1 .
# 按照MB来显示单位并排序
du -ahm --max-depth=1 ./|sort -n
# 查看文件夹占用(查看根目录下所有文件的大小)
du -sm /*
# 查看文件占用大小
du -h --max-depth=1 /usr/hdp/2.6.5.0-292
# IO测试
# 粗略测试磁盘速度
dd if=cm6.3.1-redhat7.tar.gz bs=8k count=300000 of=/dev/null
# 生成大文件
dd if=/dev/zero of=test bs=1M count=1000
# 随机生成10个小文件
seq 10 | xargs -i dd if=/dev/zero of={}.dat bs=1024 count=1
# 网络
# 查看监听端口
# netstat
netstat -atunlp | grep LISTEN
# lsof
yum install lsof
lsof -i:9001
# 查看 某一个端口的占用情况
# 查看 某一个端口的占用情况,去重要先排序才能去重计数
netstat -atunlp | grep 2181 | awk '{ print $5" : "$7 }' | sort | uniq -c
# 关闭防火墙
# 查看防火墙状态
firewall-cmd --state

# 停止防火墙
systemctl stop firewalld.service

# 新增开放端口
firewall-cmd --zone=public --add-port=端口号/tcp --permanent

# 移除开放端口
firewall-cmd --zone=public --remove-port=端口号/tcp --permanent

# 查看开放的端口
firewall-cmd --zone=public --list-ports

# 刷新防火墙
firewall-cmd --reload
# 内存
# 清除PageCache
# 仅清除页面缓存PageCache方法:
echo 1 > /proc/sys/vm/drop_caches
# 清除目录项和inode节点:
echo 2 > /proc/sys/vm/drop_caches
# 清除页面缓存、目录项和inode节点:
echo 3 > /proc/sys/vm/drop_caches
# CPU
# CPU概览
lscpu
Architecture:          x86_64
CPU op-mode(s):        32-bit, 64-bit
Byte Order:            Little Endian
CPU(s):                40 #总的逻辑CPU个数
On-line CPU(s) list:   0-39 #在线CPU编号列表
Thread(s) per core:    2 #每个Core的逻辑CPU个数
Core(s) per socket:    10 #每个Socket上的Core个数
Socket(s):             2#多少个Socket(插槽,物理CPU)
NUMA node(s):          2#多少个node
Vendor ID:             GenuineIntel
CPU family:            6
Model:                 79
Model name:            Intel(R) Xeon(R) CPU E5-2630 v4 @ 2.20GHz
Stepping:              1
CPU MHz:               1319.484
BogoMIPS:              4399.44
Virtualization:        VT-x
L1d cache:             32K
L1i cache:             32K
L2 cache:              256K
L3 cache:              25600K
NUMA node0 CPU(s):     0,2,4,6,8,10,12,14,16,18,20,22,24,26,28,30,32,34,36,38
NUMA node1 CPU(s):     1,3,5,7,9,11,13,15,17,19,21,23,25,27,29,31,33,35,37,39
# 查看当前系统的 NUMA Node
numactl --hardware
available: 2 nodes (0-1)
node 0 cpus: 0 2 4 6 8 10 12 14 16 18 20 22 24 26 28 30 32 34 36 38
node 0 size: 65442 MB
node 0 free: 294 MB
node 1 cpus: 1 3 5 7 9 11 13 15 17 19 21 23 25 27 29 31 33 35 37 39
node 1 size: 65536 MB
node 1 free: 4251 MB
node distances:
node   0   1
  0:  10  21
  1:  21  10
# 查看Socket信息
一个Socket对应主板上面的一个插槽,也指一个CPU封装,在/proc/cpuinfo中,physical id就是Socket的ID
cat /proc/cpuinfo | grep "physical id"
physical id	: 0
physical id	: 1
physical id	: 0
physical id	: 1
#...后面省略了36行,都是0,1
# 查看有几个Socket
grep 'physical id' /proc/cpuinfo | awk -F: '{print $2 | "sort -un"}'
 0
 1
# 查看每个 Socket 有几个 Processor
grep 'physical id' /proc/cpuinfo | awk -F: '{print $2}' | sort | uniq -c
 20  0
 20  1
查看Socket对应哪些Processor
awk -F: '{
    if ($1 ~ /processor/) {
        gsub(/ /,"",$2);
        p_id=$2;
    } else if ($1 ~ /physical id/){
        gsub(/ /,"",$2);
        s_id=$2;
        arr[s_id]=arr[s_id] " " p_id
    }
}

END{
    for (i in arr)
        print arr[i];
}' /proc/cpuinfo | cut -c2-
0 2 4 6 8 10 12 14 16 18 20 22 24 26 28 30 32 34 36 38
1 3 5 7 9 11 13 15 17 19 21 23 25 27 29 31 33 35 37 39
# 在 /proc/cpuinfo 中查看 Core 信息
表明一个Socket有10个Core,他们的id分别是 0,1,10,11,12,2,3,4,8,9
前面的查到机器有2个socket,所以总共有20个Core,每个Core有两个Processor,总共四十个
cat /proc/cpuinfo |grep "core id" | sort -u
core id		: 0
core id		: 1
core id		: 10
core id		: 11
core id		: 12
core id		: 2
core id		: 3
core id		: 4
core id		: 8
core id		: 9
cpu cores	: 10
# 获取总的 Processor 数
cat /proc/cpuinfo | grep "processor" | wc -l
40
# 获取每个 Socket 的 Processor 数
cat /proc/cpuinfo | grep "siblings" | sort -u
siblings : 20
# 性能CPU监控 淘宝监控
git clone https://github.com/oldratlee/useful-scripts.git

scp -r useful-scripts root@server3:/data3/test/
# SSH
# ssh匿名登陆
ssh -T root@lovedata -p65532 /bin/bash -i
# 程序
# 循环干掉job
ps -ef | grep flume | grep -v grep | awk '{print $2}' | xargs kill -9
# 杀死一个程序
kill -9 `ps aux|grep redis|grep -v grep|awk '{print $2}'`
# tmux
# 新建窗口
tmux new -s peng
# 打开窗
#Ctrl+B  然后按一下D  就可以退出这个窗口,进入外部shell
tmux a -t peng
# 支持滚动条
在 tmux里面,因为每个窗口(tmux window)的历史内容已经被tmux接管了,所以原来console/terminal提供的Shift+PgUp/PgDn所显示的内容并不是当前窗口的历史内容,所以要用C-b [ 进入copy-mode,然后才能用PgUp/PgDn/光标/Ctrl-S等键在copy-mode中移动。
如果要启用鼠标滚轮来卷动窗口内容的话,可以按C-b :然后输入
setw mode-mouse on
这就可以了。如果要对所有窗口开启的话:
setw -g mode-mouse on
(这种情况下,Vi/Emacs等全屏程序并不受影响,还可以自己接管滚轮事件)
也可以加到~/.tmux.conf里面 set-window-option -g mode-mouse on (setw其实是set-window-option的别名)
# 文件输入
cat >1.txt<<EOF
Hello,world!
EOF

cat << EOF > 1.txt
Hello,world!
EOF
# docker
# docker查看日志
docker logs -f -t --tail 100 pushgateway
# docker日志过大,清空日志
cd /var/lib/docker/containers/ab3424fef89b061abce15854402d125afb59558c6aced9088d7bc2c588abb101
cat /dev/null > *-json.log
# 批量杀死删除容器
docker kill `docker ps -a | grep 'xxx' | grep -v grep|awk '{print $1}'`
docker rm `docker ps -a | grep 'xxx' | grep -v grep|awk '{print $1}'`
# Docker镜像加速
创建或修改 /etc/docker/daemon.json 文件,修改为如下形式
{
  "registry-mirrors": [
    "https://registry.docker-cn.com",
    "http://hub-mirror.c.163.com",
    "https://docker.mirrors.ustc.edu.cn"
  ]
}
# Docker杀死所有容器
docker ps -a -q | xargs docker rm -f
# Docker定时清理日志
#!/bin/sh

DockerLogPath='/var/lib/docker/containers/'
if test -e $DockerLogPath && test -d $DockerLogPath;
then
    dockerList=`ls $DockerLogPath`
    for fileName in $dockerList;
    do
    wholeFolderPath=$DockerLogPath$fileName
    #if test -f $fileName; then
    if test -f $wholeFolderPath;
    then
        echo $wholeFolderPath;
    elif test -d $wholeFolderPath;
    then
        cd $wholeFolderPath;
        jsonFile=$wholeFolderPath'/'$fileName-json.log
        if test -e  $jsonFile && test -f $jsonFile;
        then
            echo 'Clean '$jsonFile
            cat /dev/null > $jsonFile;
        else
            echo $jsonFile' not exists!'
        fi
    else
        echo  "$DockerLogPath is a invalid path";
    fi
    done

    echo "Done"
else
   echo  "$DockerLogPath is a invalid path";
fi
crontab -e
00 19 * * * sh /root/clean_docker_log.sh
# Git
# 恢复修改
# 未使用 git add 缓存代码
#放弃修改某一个文件(注意加上"--")
git checkout -- readme.md
#放弃所有的文件修改
git checkout .
# 已经使用了 git add 缓存了代码
 #放弃某个文件
 git reset HEAD readme.md
 #放弃所有缓存
 git reset HEAD .
# 已经用 git commit 提交了代码
#来回退到上一次commit的状态
git reset --hard HEAD^
#回退到任何一个版本
git reset --hard  commitid
# FQ
# Linux离线安装v2ray客户端
参考
先在有外网的环境下在下面两个文件
- https://raw.githubusercontent.com/v2fly/fhs-install-v2ray/master/install-release.sh
- https://github.com/v2fly/v2ray-core/releases/download/v4.40.1/v2ray-linux-64.zip
- Linux下使用v2ray - Jun's Blog (opens new window)
将文件传到机器上面
sudo bash install-release.sh --local ./v2ray-linux-64.zip --version v4.40.1
vim /usr/local/etc/v2ray/config.json
# 粘贴config.json的内容到这里
systemctl enable v2ray
systemctl restart v2ray
# 产看是否能返回数据
curl -x https://127.0.0.1:1087 https://www.google.com  -v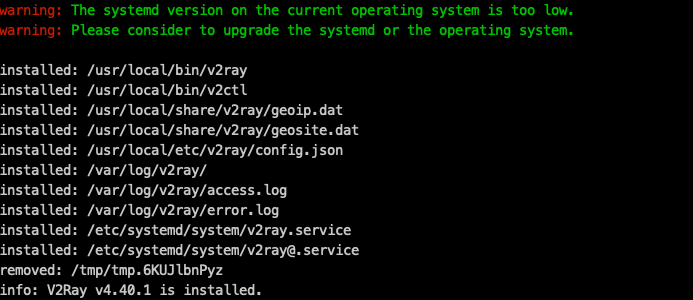
# Linux下离线安装proxychains4
参考
- https://github.com/rofl0r/proxychains-ng
- Centos 7安装Proxychains实现Linux 代理 - yunying - 博客园 (opens new window)
# 下载,如果下载不了,浏览器下载
git clone https://github.com/rofl0r/proxychains-ng
cd proxychains-ng
./configure --prefix=/usr --sysconfdir=/etc
make
make install
make install-config
cd .. && rm -rf proxychains-ng
# make: cc: Command not found  使用
yum  install  gcc
# 添加配置 vim /etc/proxychains.conf socks5 127.0.0.1 1080
Java →